Sales Hub is your single point of managing inquiries, quotes and orders, and a portal for communicating with your customers.
In this brief overview, you’ll learn:
- Where to find new incoming inquiries
- All about inquiry/quote status
- How to convert an inquiry to a quote
- How to create a new quote
- How to add taxes and discounts to your quotes
Dashboard overview
When you open your Sales Hub, the first thing you’ll see is your dashboard. The dashboard is there to give you vital information about your sales at a glance.

The dashboard displays a count of all inquiries received, quotes sent, expiring soon, and quotes confirmed in a given time period. By default, this is set to the past week, but you can adjust the time filter differently if you prefer (in the screenshot, month-to-date view is displayed). Click on View all under each counter to open the corresponding inbox folder (Inbox, Sent, Expiring soon, Confirmed).
Requires your attention
You’ll also see a list of inbound inquiries, quote responses, and messages that have been assigned to you and require your attention. This lets you jump straight in without having to dig through each inbox folder.
Monthly statistics
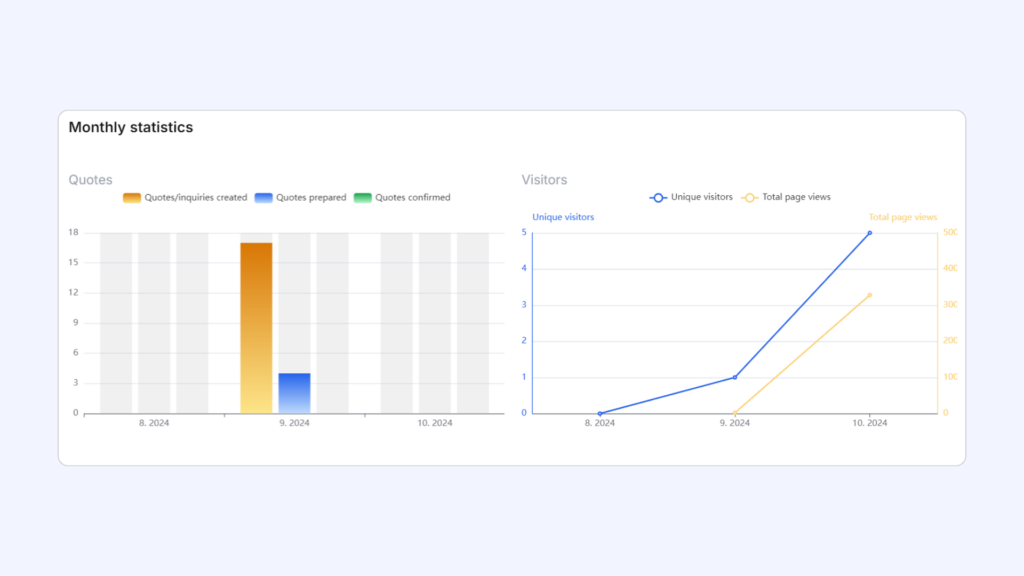
Scroll to the bottom of the dashboard to see your monthly statistics. It gives you quick high-level insight into your business performance and growth.
Two default insights are displayed:
- Quotes by month: bar chart showing a tally of all monthly quotes created, prepared, and confirmed.
- Visitors and page views: line chart showing how many individual customers visited your configurator and how many page views they had in total.

Quotes tab
The Quotes tab is your inbox, containing all your inbound inquiries and prepared quotes. It is designed to work like an email inbox, so you should have no trouble getting comfortable with it. It includes standard folders like Sent, Drafts, and Archived, and also special folders that filter your documents by status.
You can create additional folders by adding custom tags to your quotes. Use the search, filter, and sorting tools at the top of the list to quickly find the document you’re looking for.

Each list item displays its basic meta data:
- 🔥 Hot lead identified icon
- Confirmation that the quote was sent (✔️) and opened by the recipient (✔️✔️)
- 🛒 Inquiry source icon (mouseover for details)
- Color-coded status tag
- Document number
- Customer name and company, if applicable
- Product (this is usually the configurator name)
- Any custom tags that have been added
- Quote value
- Date created
- 📎 View attachments icon
- 🗃️ Archive icon
- 🗑️ Delete icon
Identifying hot leads
The 🔥 hot leads indicator identifies customers showing a high level of engagement and interest. This feature uses engagement data, for example how quickly and how many times the customer opened the quote.
You can improve your lead scoring accuracy by combining the default data with custom data captured using additional questions in the inquiry form. These questions help you better assess how ready the customer is to complete the purchase. If you’re interested in improved, please contact our team and we’ll be happy to help you set it up.
Customers tab
The Customers tab contains a list of all your customers. In addition to inbound customers, you can also manually add customers (both individuals and organizations) here.

You can review customers’ data, including their quote history, and also update their contact information. Note: any previously created documents will retain old contact data.

Working with quotes
Click on an inquiry in the list to open it.
Depending on your Sales Hub settings, you’ll either be able to see the PDF that was generated when your customer submitted their inquiry, or the interactive quote. The example given here shows what the interactive quote looks like.

In the Toolbox on the right, you’ll see the quote’s meta information, for example terms, additional information, labels, and assigned sales reps. You’ll also be able to review recent activity on the quote in timeline format. You can also generate a PDF and download it to your computer if needed by clicking on the Download quote PDF button.
Assigning to a sales representative
To assign the inquiry or quote to a team member, use the drop-down selector at the top of the Toolbox.
Adding labels
You can add custom labels to your quotes. These are internal, so your customers don’t see them. Labels add an additional dimension you can use to filter quotes in the inbox.

Looking at the quote’s status bar, you’ll again be able to see if the customer has been identified as a hot lead, if the quote has been opened by the recipient, etc. In the middle of the bar, you’ll see the progress status, and on the right are icons for the duplicate, archive, and delete operations.
To work on the quote and create a draft, click on the Prepare quote button.
When working on a quote draft, you can rest easy – all changes you make are saved as you go.
Quote anatomy
The head section of the quote draft contains the customer’s contact data, as well as two dates: its creation date and expiry date.
You can also add a custom message to the quote’s head section. Click on the message placeholder to activate editing mode, then type in your message.

The quote’s body section is where you’ll find the inquired product(s) and their specifications.

The body section is where you’ll do most of the editing of your quote – applying any discounts, adding taxes or surcharges, while the application does all the calculations for you automatically.
Let’s look at the elements and tools you’ll find here:
- Main product toolbar: Here, you’ll find the Discounts and Taxes drop-down menus, where you’ll find global operations: Add discounts/taxes, Increase taxes, and Clear all discounts/taxes. You can also +📁Add folders to organize multiple products into groups, and ❌ Clear all products.
- Show BOM button: Click on this button to view the product’s Bill of Materials (BOM).
- Product quantity selector: Use + and – to adjust the product quantity.
- Product operations: Use the icons to ✏️ Edit product configuration (opens up the configurator), 📄📄 Duplicate product, or 🗑️ Delete product.
- Edit unit price: Use the ✏️ Edit icon to toggle the unit price editing field.
- Edit VAT tax rate: Use the ✏️ Edit icon to toggle the VAT tax rate editing field.
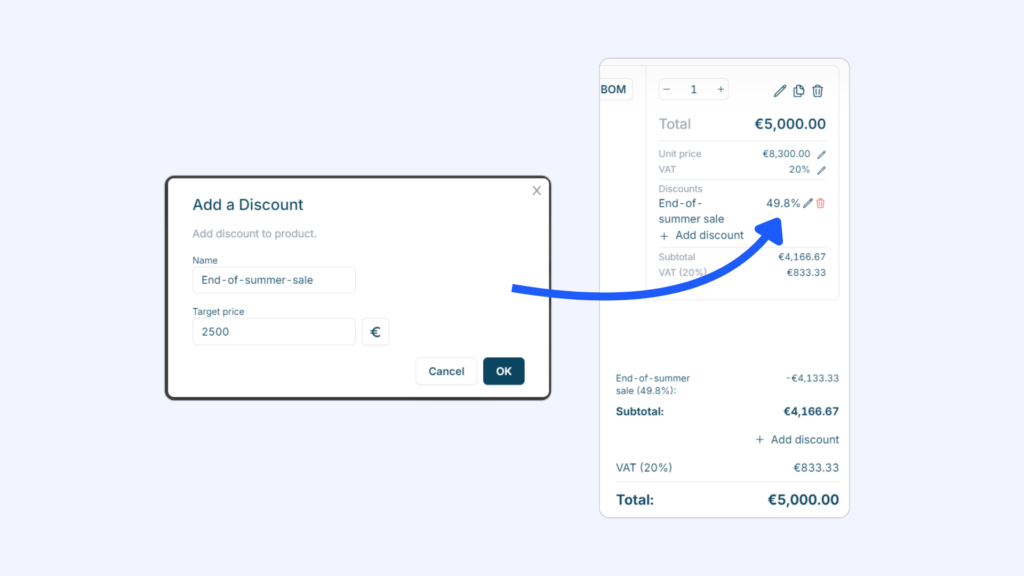
- Add discount: Click on + Add discount to add a discount that applies only to the current product. This option also lets you set a target price in place of a percentage discount rate.
- Add product: Click on + Add product to add more products. This will open up a list of your available products, and after selecting one, you’ll configure its options using the product configurator.

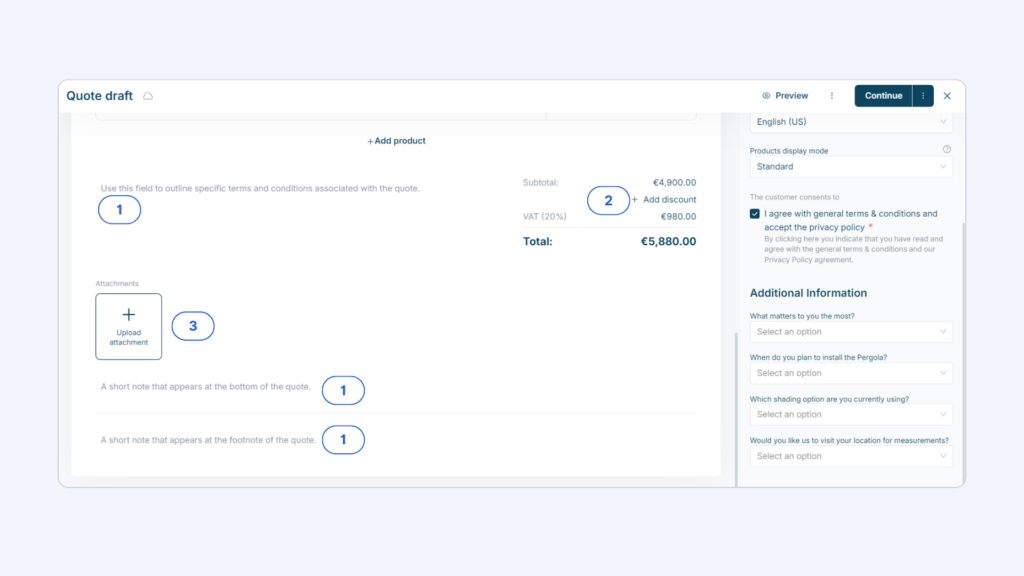
In the bottom section of the quote draft, you can add more custom notes, add global discounts, and upload attachments.
- Add custom messages: Add notes outlining any specific terms and conditions in the quote total section, at the bottom, or in the footer of the quote.
- Add global discounts: Click on + Add discount and add a discount that will be applied to the quote subtotal.
- Upload attachment: Use the + Upload attachment field to upload an attachment from your computer (eg. detailed terms and conditions).

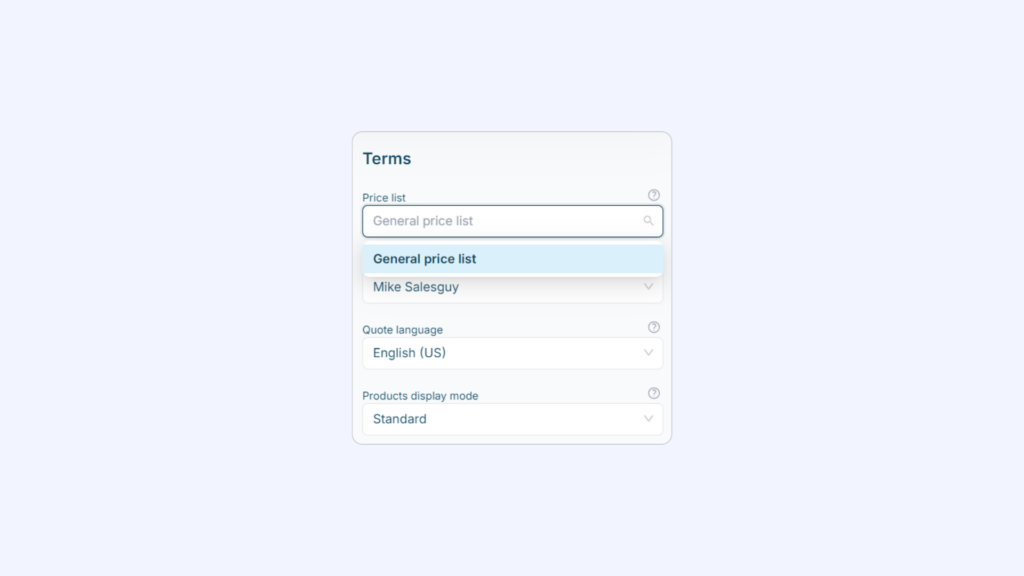
When working on your quote draft, you can also edit some additional settings in the Toolbox on the right.
- Change the Price list applied to the quote
- Change the Sales representative the quote is assigned to
- Change the quote’s display language
- Change the Product display mode
To edit any of these settings, simply click on the corresponding drop-down field and select the desired option.
Product display mode
There are currently two product display modes: Standard (top screenshot) and Compact (bottom screenshot). You can use different modes for different customer types (eg. standard mode for end users and compact mode for resellers).

From inquiry to confirmed quote
Step 1: Customer submits inquiry
The customer uses your product configurator to configure the product according to their needs and successfully submits an inquiry.

Step 2: Waiting for quote
Once the inquiry is submitted, the customer receives an email confirmation with a sharable link to their inquiry.

At the same time, the inbound inquiry now appears in the Sales Hub. Your team will also be notified of the inquiry via email.

To move the deal forward, convert the inquiry into a quote. When viewing the inquiry, click on Prepare quote. Review the quote draft and make any changes you need to (see Working with quotes). You can see how the quote will look for your client by clicking on 👁️ Preview.
Click on Continue to proceed to the Send quote modal.

Add a message for the customer if you like, then hit Send quote.
Alternatively, you can also save the quote without sending it to the client. To do this, click on the ellipsis button to display the Continue without sending option.

Step 3: Waiting for confirmation
Once you’ve converted your inquiry to quote, all that’s left is for the customer to confirm the quote.

Here’s what your customer sees:

The quote can be confirmed by either party by clicking on the Confirm button.
If you need, you can make further edits to the quote (click on the Edit button) and send the new version of the quote to your customer. The process is the same as in Step 2.
The customer can also request edits to the configuration. In this case, they can reopen the product configurator, make the desired changes, and resubmit the inquiry. By creating a new version of the product configuration, the document reverts back to inquiry status, and is now once again in Step 2.
If you create additional quote versions, each subsequent quote number will be appended with a version number.
You can review activity on the quote/inquiry by looking at the Recent activity section of the Toolbox.

Either party can decline the quote by clicking on the Decline button. This cancels the deal.
Step 4: Confirmed quote
Congratulations! Your quote has been confirmed 🍾

Adding discounts
Example 1: Adding discounts to all products
We added a discount that was applied at the product level. Go to the Discounts drop-down selector, choose Add discount, then enter a discount name and discount rate (in %).

Example 2: Adding a discount based on target price
We added a discount by setting a target price (only for product-level discounts). The application then calculates the correct discount rate. (Note: If you want to adjust the target price, you’ll need to remove the existing discount and create a new one).